
Overgrown nails can lead to a multitude of problems. One of such is discomfort and difficulty perching to serious injuries. However, the task of trimming bird nails often strikes fear into the hearts of even the most experienced bird owners.
The delicate nature of the procedure and the potential for causing bleeding can be daunting. But with the right knowledge, tools, and a calm, patient approach, you can successfully trim your bird’s nails and ensure their comfort.
This article delves into the intricacies of avian nail trimming, providing a comprehensive, step-by-step guide to help you master this essential aspect of bird care.
READ MORE: How To Treat Lice in Your Cattle
Types Of Bird Nails
The nail consists of two main parts:
The Keratinized Nail:
This is the hard, visible part of the nail that grows outward. It is a presence in many mammals and reptiles.
Usually, the keratinized nail is usually very visible unlike the Quick. Now, let’s take a look at the second parts of the nail.
The Quick:
This is the living tissue inside the nail that contains blood vessels and nerves. It’s the pinkish or reddish area visible within the nail, especially in birds with lighter-colored nails. In birds with dark nails, the quick is not visible.
The goal of nail trimming is to shorten the nail without cutting into the quick. Cutting the quick will cause bleeding and pain, so precision and caution is very important.
Reason For Cutting Birds Nails
Overgrown nails in birds can cause the following:
Difficulty Perching:
Long nails can interfere with a bird’s ability to grip perches properly, leading to instability and discomfort.
Injuries:
Overgrown nails can get caught on fabric, toys, or cage bars, potentially leading to broken nails, torn skin, and other injuries.
Doscomfort and Pain:
Long nails can curl and grow into the bird’s foot pads, causing pain and inflammation.
Increased Risk of Infection:
Injuries from overgrown nails can create entry points for bacteria and other pathogens, increasing the risk of infection.
Difficulty Walking:
Terrestrial birds, such as some parrots, can have difficulty walking if their nails are excessively long.
Tools For Cutting Your Birds Nails
Here are the tools needed for bird nails:
Avian Nail Clippers:
These are specifically designed for trimming bird nails and come in various sizes and styles. Scissor-type clippers or guillotine-style clippers are common choices. Choose clippers that are sharp and comfortable to use.
Styptic Powder or Cornstarch:
This is essential for stopping bleeding if you accidentally cut the quick. Styptic powder contains ingredients that promote blood clotting, while cornstarch can also be used as a temporary measure.
A Bright Light Source:
A good light source is important for visualizing the quick, especially in birds with dark nails. A flashlight or headlamp can be helpful.
A Towel or Restraint Glove (Optional):
Some birds may require restraint during nail trimming. A towel can be used to gently wrap the bird, or a restraint glove can provide added protection.
Food or Treats:
Positive reinforcement is essential for a stress-free nail-trimming experience. Have your bird’s favorite treats on hand to reward them for good behavior.
A Calm and Quiet Environment:
You can choose a quiet and distraction-free environment for the nail-trimming session.
The Step-by-Step Process Of Cutting A Bird Nails
Now that you have the necessary tools and knowledge, let’s delve into the step-by-step process of trimming your bird’s nails.
Step 1: Creating a Calm and Positive Atmosphere
Do well to create a calm and positive atmosphere. Talk to your bird in a soothing voice and offer them food. If your bird is very anxious, consider practicing handling and foot touching sessions before attempting to cut their nails.
Step 2: Securing Your Bird (If Necessary)
If your bird is calm and cooperative, you may be able to trim their nails without restraint. However, if they are anxious or prone to struggling, gentle restraint may be necessary. Do well to gently wrap your bird in a towel, leaving one foot exposed. Ensure the towel is snug but not too tight.
Step 3: Keep In Mind The Quick
Recall that the Quick is the one of the sensitive parts of a bird nails. When trimmed, the quick can bring out blood and cause pain to the owner.
Examine your bird’s nails to locate the quick. In birds with light-colored nails, the quick is typically visible as a pinkish or reddish area.
In birds with dark nails, the quick may not be visible. In these cases, it’s best to err on the side of caution and trim only a small amount of the nail.
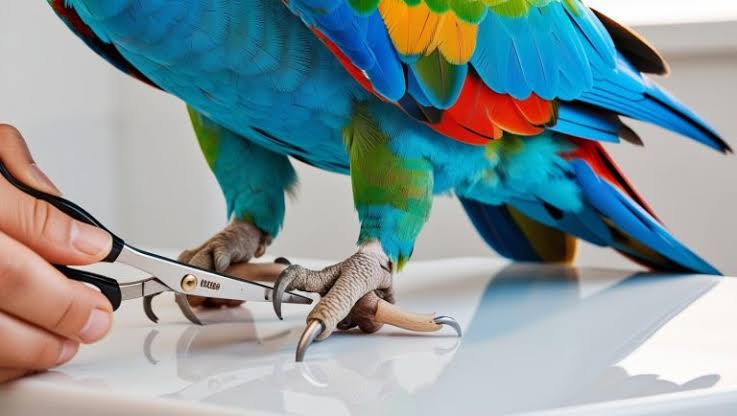
Step 4: Trimming the Nails
Using the avian nail clippers, carefully trim the keratinized nail, making small cuts to avoid cutting the quick.
Step 5: Stopping Bleeding (If Necessary)
If you accidentally cut the quick and bleeding occurs, apply styptic powder or cornstarch to the affected area. Apply pressure for a few seconds until the bleeding stops. You can visit the veterinary for help when necessary. Do well to do this to endure bleeding stop.
Step 6: Rewarding Your Bird
After trimming each nail, offer them a treat and praise them for their good behavior. Feeding your pet will help you create a special bond with him. This bond will help your relationship with him afterwards.


One thought on “How To Trim Bird Nails”